


This easy multigrain no knead bread incorporates a 10-grain (or 7-grain) hot cereal mix into the dough, adding a delicious nutty, earthy taste and texture, as well as more nutrition, fiber, and protein than a white loaf! We’re also adding whole wheat flour and mixed seeds to the dough to make it even more nutritious and hearty, with a pleasant crunch in each bite. Using whole grains in bread often creates a challenge in keeping the bread moist and getting a good, tall rise, which is why we’re baking in a Dutch Oven to help trap the steam and using bread flour as part of the mix. The result is a loaf that is never dry and gets a relatively great rise!

Would you like to email yourself this recipe?
Perhaps you’re here because you’ve already tried my no knead Dutch oven bread. It’s by far the most popular recipe on Bowl of Delicious with thousands of five-star reviews. It’s so incredibly easy – and fast with a two hour rise time!
So If you’re looking for a whole grain no knead bread version, this is such a great recipe. It still has a short rise time – two hours or less. And the method is relatively the same, with a few extra wholesome ingredients.
Using whole grains can be difficult with bread baking. They’re heavier, literally, than white flour, since they have the bran, germ, and endosperm of the grain still (which contain nutrition, fiber, and flavor otherwise lost in refined, white flours). With whole wheat flour, the gluten content is lower. This can make it difficult to get a tall rise out of the bread. Using 100% whole wheat flour in bread often yields a very dense loaf. I like to find a happy medium when baking with whole wheat by using a mix of white and whole wheat flour.
Which is why in this multigrain no knead bread recipe, we’re adding flavor, nutrition, and fiber by including a multigrain hot cereal mix and a mix of seeds in the dough. We’ll also use part whole wheat flour and part bread flour, the latter being high in gluten to make up for the denseness of the grains and seeds and their lack of gluten. The mixture allows for a wholesome, healthier bread option while still being relatively easy to achieve a tall rise and fluffy loaf by using white bread flour in the mix as well.
Please note, no matter what you do, the more whole grains you add to your bread the likelier it will be a bit flatter and denser. So don’t go into this multigrain no knead bread expecting it to be exactly like your white flour loaves you’ve made in the past. It’s different, but not in a bad way!
What kind of multigrain hot cereal mix should I use in my bread?
I use Bob’s Red Mill 10-Grain Hot Cereal Mix when I bake multigrain no knead bread. Bob’s Red Mill also makes a 5-grain, 7-grain, and 8-grain mix, which are usually a bit easier to find in grocery stores. The more grains, the more nutritional diversity you’ll get.
Any multi-grain hot cereal mix should work. If you happen to have a stash of multiple whole grains at your house (which may include cornmeal, rye, oats, rice, quinoa, amaranth, barley, wheat, spelt, etc.) you can certainly try to make your own mix!
Some multigrain mixes, like King Arthur Harvest Grains, may also include seeds. Since this recipe uses a multigrain mix plus added seeds, you can just use a half-cup more of the Harvest Grains blend and omit the added seeds in this recipe.

Ingredients and Substitutions
- Active Dry Yeast – or instant / rapid rise. Just keep an eye on the dough because it will take less time to rise to double.
- Warm water – heated to about 110 degrees F. This is important for activation of the yeast but not too hot or the yeast will be killed (I use a quick read meat thermometer to check the temp after microwaving it).
- Honey – maple syrup can also be used especially for a vegan option.
- Multigrain hot cereal mix – a 10-grain, 7-grain, or other multigrain mix (see section above with more info on this ingredient).
- Sunflower seeds, flax seeds, and sesame seeds – feel free to use other seeds like poppy, chia, or pumpkin. You can omit the seeds and replace with 2 tablespoons more of the cereal mix.
- Fine grain sea salt – or other fine grain salt like table salt, preferably not iodized. If using kosher salt or other coarse grain, you may need a bit more.
- Whole wheat flour – I use King Arthur Whole Wheat Flour.
- Bread flour – I use King Arthur Bread Flour. Bread flour is also called “strong flour” in the UK, or high-gluten flour.
- Rolled oats or seeds for topping the bread – optional, but makes it pretty!
How to make seeded multigrain no knead bread in a Dutch Oven
First, mix the warm water, honey, and yeast together. Let it sit for a couple of minutes to make sure the yeast is active – if it is, there will be some bubbles that form on top. If not, you might need to start over with a new batch of yeast (see recipe notes for more on this). Then, add the multigrain cereal mix and seeds. Allow them to soak for 10 minutes, then add the whole wheat and bread flours.


Now, we’ll mix the dough. I like to use a standing mixer with a dough hook to make it easier. It’s best to mix it for a few minutes which will help develop the gluten, and a standing mixer makes easy work of this. I then like to transfer the dough to another bowl that’s shallower than the standing mixer (which makes it easier to remove from the bowl after rising). Let the dough rise in a warm place – I usually place it in the oven with just the light on, which adds just a little heat – until doubled in size.


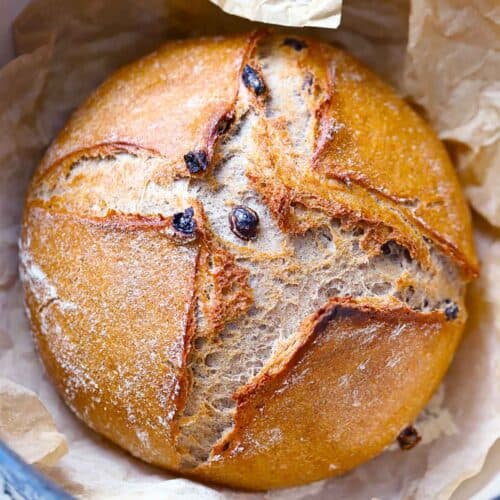
Now, shape the dough into a round or oval shape. There are a few ways you can do this, and if you’re new to the break baking game, I suggest you follow the easy shaping method on my original no knead bread recipe. Place the loaf seam-side-down on a piece of parchment paper. If you’d like to add toppings, use your hands or a pastry brush to dampen the top of the loaf with water. Then sprinkle the toppings on (I used rolled oats, you can also use seeds here) and press them on so they’re secure.


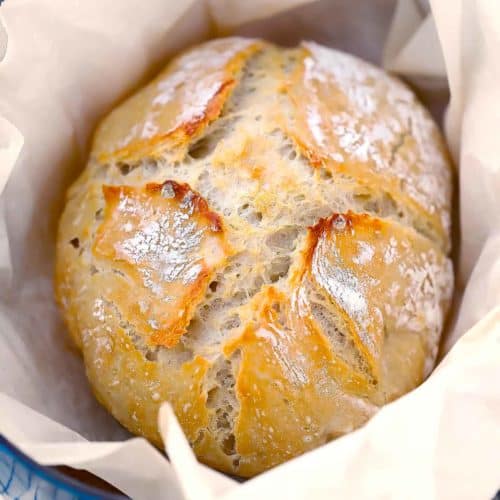
Finally, it’s time to bake! If you like, you can score the top of the loaf (I did an x shape) with a sharp knife. Grab the parchment paper by the edges and plop everything – parchment paper AND the loaf – into a Dutch Oven. Then, bake in a hot oven (450 degrees F) for 40 minutes covered and 10 minutes uncovered. (Optionally, you can also preheat your Dutch Oven by placing it into the oven while it preheats, and VERY CAREFULLY transfer the parchment and dough to the hot Dutch Oven, which may yield a taller loaf).


The hardest part now? I recommend waiting at least 1 hour before slicing into it. The texture may be gummy if sliced too early. It’s difficult to wait, but you will persevere. I know you can do it! Remove it CAREFULLY from the Dutch Oven (it’s hot!!) and allow it to cool on a wire rack for best results.
Can I use all-purpose flour instead of bread flour?
While bread flour is preferred for its high gluten content which will yield a stronger, taller multigrain loaf, you can use all-purpose flour in a pinch! If you do, add 2 tablespoons more of it, as it doesn’t absorb as much water as bread flour.
Alternatively, you can supplement your all purpose flour with vital wheat gluten! Instead of using 2 tablespoons more of the AP flour, use 1 tablespoon of vital wheat gluten in the mix.
Can I use 100% whole wheat flour and skip the bread flour?
Fair warning: while doable, using 100% whole wheat flour and omitting the bread flour will be tricky. It may result in a flat, dense loaf. If you want to try it, I recommend adding 2 tablespoons of vital wheat gluten. This will increase the gluten content and may help with rise.
Personally, I find using 100% whole wheat in my baking often yields a lot of frustration while baking, as well as a result that I don’t want to eat. Half of it often ends up uneaten in the trash. But many people have good luck with 100% whole wheat, so it’s worth trying if you’ve never done it before!

Dutch Oven and Parchment Paper Recommendations
Someday, I’ll treat myself and buy a Le Creuset. But honestly? I’ve been using my Lodge 6 qt. Dutch Oven for years and it’s been treating me so well. And it’s about a fifth of the cost of a Le Creuset! And the knob it comes with is metal and completely oven-proof.
For parchment paper, I’m absolutely obsessed with these extra strong pre-cut parchment paper sheets. Are they the most life-changing kitchen product I’ve ever owned? I mean… yeah, I think they are. They nestle perfectly into a half sheet pan for baking cookies or roasting veggies. And they are SO STURDY, which makes them perfect for Dutch oven bread since they are easy to transfer the loaf in and out without breaking. And no curled-up edges like you get from a roll!
How to store leftovers
Once the loaf is cool, I recommend slicing and freezing it in a zip-top bag. This will keep the bread the freshest tasting – you can take a slice or two out as needed to defrost in the microwave or pop in the toaster.
After 24 hours stored in an airtight container at room temp, it’s going to start drying out. Which may not be the WORST thing, because dry leftovers of this multigrain bread would make the BEST homemade croutons!
Other no knead bread recipes
If you like this multigrain no knead bread, be sure to check out these other easy no knead bread recipes!


Did you know commenting and rating recipes is one of the best ways you can support your favorite food bloggers? If you made this recipe or have a question, please click the stars below to comment and Rate this Recipe. Share photos on social media and tag @bowlofdelicious! I reply personally to every comment and I’m excited to hear what you think.

Multigrain No Knead Bread (in a Dutch Oven)
Equipment
- 5-6 qt. Dutch Oven see notes if you don't have one
Ingredients
- 1 ¾ cups warm water heated to about 105 degrees F, see notes
- 2 ¼ teaspoons active dry yeast 1 packet, see notes for rapid or quick rise
- 2 tablespoons honey or maple syrup for a vegan option
- ½ cup multigrain hot cereal mix such as Bob's Red Mill 10- or 7-grain hot cereal mix
- ¼ cup raw sunflower seeds
- 2 tablespoons golden flaxseeds or brown
- 2 tablespoons sesame seeds
- 1 ½ teaspoons fine-grain sea salt see notes
- 2 cups bread flour see notes for all-purpose flour
- 1 cup whole wheat flour
- handful of rolled oats or more seeds for topping the loaf, optional
Want to save this recipe?
Instructions
- Whisk the 1 ¾ cups warm water, 2 ¼ teaspoons active dry yeast, and 2 tablespoons honey together in a large bowl or the bowl of a standing mixer. Let it sit for 2 minutes; the mixture should have a few bubbles on top (this will indicate that the yeast is good – see notes if you don't see bubbles!).
- Add the ½ cup multigrain hot cereal mix, ¼ cup raw sunflower seeds, 2 tablespoons golden flaxseeds, and 2 tablespoons sesame seeds. Stir together well and allow to sit for 3-5 minutes, until the grains and seeds soften and absorb some of the water.
- Add the 1 ½ teaspoons fine-grain sea salt and give it a quick mix to help dissolve and distribute the salt. Then, add the 2 cups bread flour and 1 cup whole wheat flour and mix together very well (the longer you mix, the more gluten will develop, which will help make a taller loaf; a standing mixer with a dough hook makes easy work of this).
- Cover the bowl tightly with plastic wrap or a damp towel. Let the dough rise for 1 ½ – 2 hours in warm place until at least doubled in size (see notes for more information on letting the dough rise – it may take longer or shorter depending on the environmental factors so be prepared to be flexible on timing here).
- Preheat the oven to 450 degrees F when you are almost ready to bake. Optional: You can place your Dutch oven and cover into the oven while it preheats, getting the pot nice and hot. Then, you'll transfer the loaf into a preheated Dutch oven when it's time to bake – but be VERY CAREFUL and remember to use potholders! This may yield a taller loaf.
- Shape the dough into a round or oval shape. Then, place the shaped dough seam-side-down on the center of a piece of parchment paper. (Shaping can be done a few different ways, if you are unfamiliar I recommend looking at this original no knead bread recipe which has an easy shaping method great for beginners!).
- Optional: Using your hands or a pastry brush, dampen the top of the loaf with water. Sprinkle a handful of rolled oats or more seeds on top and use your hand to gently press them on so it sticks. If you like, you can also score the top of the loaf using a lame, razor blade, or very sharp knife.
- Pick up the parchment paper by the edges and place the bread AND parchment paper inside the Dutch Oven. Optionally, you can add 1-2 ice cubes to the pot in between the parchment paper and the pot, which will melt during baking and help increase the steam.
- Bake for 40 minutes covered at 450 degrees F. Then, uncover and bake for 10-15 minutes more, until nice and brown on top.
- Carefully transfer the loaf to a wire rack to cool. I recommend cooling for at least one hour before slicing into it – any earlier and the bread may have a gummy texture. It's difficult to wait, but you can do hard things. Store leftover bread in an airtight container for up to 24 hours (beyond that it will dry out significantly) or slice once completely cool and store in a zip-top bag in the freezer and take out a slice to defrost or toast as needed.
Notes
- The temperature of the water is important. It can be anywhere between 100 degrees and 115 degrees F. Any hotter than that and it may kill the yeast. Any cooler may cause the yeast to not activate which may cause the dough to rise extremely slowly. A quick read meat thermometer is a good way to get an accurate reading on temperature, but you can also put a little water on the inside of your arm and if it feels pleasantly warm and doesn’t burn you, it should be fine!
- Rapid or quick rise yeast can be used here, but they will, as the name suggests, cause the dough to rise faster. So keep an eye on it so the dough doesn’t overproof (which is when it starts to deflate because the yeast runs out of food to eat and stops multiplying).
- Letting the dough rise in a warm place helps the yeast multiply faster causing a faster rise. The cooler the environment, the longer it will take to rise. I like to place my bowl in the oven and turn on the oven light – the heat from the lightbulb makes the temperature inside my oven about 110 degrees F which is perfect! You can also microwave a mug of water until it’s boiling, then put the bowl in the microwave with the steaming mug of water and close the door to create a warm, humid environment.
- If using kosher salt or coarse salt, be sure to up the amount to about 2 teaspoons since there is less salt per teaspoon. For those who like salty flavor, you may want to up the total amount of fine salt to 2 teaspoons. It’s preferable to not use iodized salt as there is some thought that iodine can hinder yeast development and add a taste to the bread, so sea salt is often used with bread baking for this reason. If all you have is iodized salt, just use it- it will be fine!
- Bread flour is used instead of all purpose flour because it has a higher gluten content. Because whole wheat flour has much less gluten, and the seeds and grains weigh the bread down, the loaf will benefit from having more gluten in terms of getting a taller, stronger loaf. That said, if all you have is all purpose, no need to go to the store. Use 2 tablespoons more all purpose flour if you are substituting it for the bread flour. Or, if you happen to have some vital wheat gluten, feel free to add 1 tablespoon of it to the mixture to help increase the gluten content if using all purpose flour (in this case, don’t do the extra 2 tablespoons flour).
- If your yeast doesn’t bubble when mixed with warm water and honey: that likely means the yeast is not good. Yeast is a living organism and sometimes you get a dead batch or if it’s been sitting around for a while it may die off. If the yeast is dead, the dough won’t rise and your bread won’t turn out! If after a couple of minutes it doesn’t look like it’s bubbling, let it sit for a full 10 minutes. After 10 minutes, it should foam up substantially and double in size. If it doesn’t, it either means the water temperature was not accurate or you have a dud batch of yeast. Try again with new yeast from the store and double check your water temp!
- No Dutch Oven? A Dutch Oven is used to help trap the steam inside while the bread bakes. As an alternative, you can use another covered pot, or a pot with a skillet inverted on top or tightly covered in foil, or something like that. Just make sure everything is oven-safe! Alternatively, you may have a “steam bake” function in your oven (I do, and it works beautifully!). Or you can create a steamy environment by placing a rimmed baking sheet on the bottom rack filled with water, which will evaporate and create steam while the bread bakes on the top rack (in this case, you can bake the bread on a baking sheet or cast iron skillet or pizza stone, etc.). I’ve had hit or miss results with the latter method but it’s OK in a pinch!
- If you want to omit the seeds, just leave them out and add about two tablespoons more of the multigrain cereal mix.
Nutrition
Nutrition Information Disclaimer
The provided nutrition information is my best estimate and reflects one serving of the recipe (total servings indicated at top of recipe card). It does not include any added sodium from seasoning to taste, any optional ingredients, and it does not take brands into account. I use an automatic API to calculate this information. Feel free to calculate it yourself using one of these tools:
Berkley
How would you adjust this for a 4 qt. Dutch oven? Just cut all the ingredients by 1/3?
Elizabeth Lindemann
I’d cut everything in half to start with (and this will make the conversion easy for you – in the recipe, you can adjust the servings from 8 to 4 and the ingredients will adjust for that amount of servings!). You probably won’t need to bake it for quite as long, so I’d take 10 minutes or so off the covered baking time.
Berkley
Thanks so much! Will definitely try this soon!
Kristen
What a delicious bread! Crust, crumb and flavor — plus the flexibility it offers for your favorite seeds/nuts — make this my new go-bread for toast and sandwiches. I’ve baked a lot of bread but keep only the very best recipes, and this one is on top right now! Thanks for sharing.
Elizabeth Lindemann
So glad you liked it and thanks for the kind comment!
Michelle
I use a no knead white bread recipe that I can let “ferment” in the fridge for up to 3 days, and it really does improve the depth of flavors. Can I do the same with this recipe?
Elizabeth Lindemann
Yes, I think it should work just fine with this recipe!
Michelle
Thank you.
Cathy Reid
I have made this recipe several times now and it has always turned out wonderfully. Bread is dense and chewy.
Elizabeth Lindemann
So glad you liked it!
George E Spalding III
I have made this bread twice now. The first time, at 450F, I thought it was a little too close the being burned, so the second time I cut the temp down to 425F. I thought that came out better. I used maple syrup, Bob’s Red Mill 5-Grain cereal, and potassium salt as I have blood pressure. Next time I will keep the temp at 425F but add a bit more water in my pre-heated dutch oven.
Thank you.
Elizabeth Lindemann
So glad you liked it, and glad you were able to figure out a temperature that worked well for you!
Sharen Craig
Hi thank you for the recipe. I’m new to baking bread so I have a few questions. The bread came out flat after baking. I’m wondering why. Did I over knead it in the machine. Maybe I did it for ten minutes. I used coarse salt but only saw afterwards that I should have increased it by half a teaspoon (to 2 teaspoons). I baked it in a Dutch oven. This is the second time I baked with wet dough and I’ve had trouble each time. I feel my dough was a lot wetter than yours. What do you suggest I do?
Elizabeth Lindemann
These are both super common questions. My follow up would be: did the dough rise at least double in the bowl? If it didn’t rise, or didn’t rise enough, that would be the answer to your first question – either the yeast was bad or weak, or it needed more time to rise (especially if it was cold!). But if it did rise, the most common reason for a dense flat loaf is overhandling it when shaping. When shaping the loaf, it’s really easy to smush out much of the air pockets created by rising, which can end up with a dense loaf. It takes practice, especially with such a loose and sticky dough! The other reason is that if the dough rose a LOT, it potentially over-proofed. This means the yeast run out of food to eat so they stop multiplying, and when you put it in the oven it tends to delfate rather than get higher.
For your second question with wet dough – this dough is definitely a bit wetter than others. It can get a bit wetter if you mix it a lot in the beginning, which is sounds like you did. It’s a double-edged sword – it increases gluten by mixing but also incorporates the water so well that it gets a bit… gloopy lol. Sometimes more flour needs to be added – either because of mixing a lot, or because the brand of flour absorbs water differently, or because of measuring a bit differently if using cups. Next time, I recommend adding a bit more flour to the dough, or if you want you can use bread flour, which tends to absorb more water and also has more gluten to begin with!
Hope that helps! I’m years into this and I STILL get flat loaves sometimes – no two loaves are the same!
Kerrilyn VH
Good texture, flavor amd rise.I made the night before, added 1/2 cup bread flour (very humid here) and put it in the fridge. A bit over proofed this morning. Will reduce yeast next time I make overnight. Left on counter for about 15 min while heated oven. Put in cold dutch oven. Easy to handle chilled dough. Baking time was spot on. Thank you, Elizabeth, for the lovely recipe. I have a few photos if you’d like me to forward. Happy New Year!
Elizabeth Lindemann
So glad you liked it! Happy new year!
Christine
Great recipe and so easy. All the tips are so useful. Will make this often.
Elizabeth Lindemann
So glad you liked it!
Carolyn
Hi
Haven’t made this yummy looking bread yet. I was wondering if I could substitute whole wheat bread flour for the regular whole wheat flour and what adjustments would be needed?
Elizabeth Lindemann
I think substituting whole wheat bread flour would work really well here! Honestly I’ve never even heard of whole wheat bread flour – it’s great to know that exists. Bread flour has a higher gluten content than regular flour, which can enhance the strength of the dough and make it fluffier. It also makes the flour a bit thirstier, so you may want to add a little more water (maybe like 1-2 tablespoons) – but this recipe isn’t that serious in terms of exact amounts. Hope that helps and good luck!
Bob
Not really. But when I submitted a 4 star review it was deleted. Four stars because it isn’t really innovative. Four stars because you are just piling up the landfills with parchment paper garbage – try a silicone sling instead, this also leads to a crackly crust instead of a limp soggy one.
Let’s see if this disguised four star review sticks.
Elizabeth Lindemann
I manually approve all comments that come through, both so I can make sure it’s all helpful and not spam, and also so I can make sure to reply to every single one of them. I do always reply to comments, but since it’s just me running this operation, it doesn’t always get done right away. Just after your comments were submitted, I not only had guests come to town but we also had a severe storm that resulted in power outages and our internet being down for multiple days. Next time you comment, please notice that a message pops up that says “your comment has been submitted for moderation.” I do not delete comments or reviews unless they are clearly spam or written by trolls/super rude. Hope that helps ease some of your concerns. I just finished responding to your original comment.
Kaylee
This review is unreasonable. Why hold a recipe to such ridiculous standards? Should we stop sharing recipes for simple dishes that people have passed down for generations because they aren’t “innovative” anymore? Are you aware of the existence of compatible parchment paper?
Elizabeth Lindemann
Thanks for chiming in :-)
Shelly
Parchment paper is totally compostable in our city, so I use it often and with many things, it saves on overusing water to wash a loaf pan or cookie sheet.
Elizabeth Lindemann
That’s awesome!
Beth
decent recipe, nothing innovative. I would strongly suggest ditching the landfill-popping parchment and start using silicone slings – this also has the advantage of allowing the dough to touch the hot dutch over, resulting in a deliciously crackly crust all around, instead of the soggy-ish result from parchment.
Elizabeth Lindemann
Thanks for the suggestion for the alternative to parchment paper! I’m always looking for ways to help reduce waste in the kitchen, and I’ll look into getting one of those silicone slings to try. It’s important to note that parchment paper does not result in a soggy crust, and the silicone sling also covers the bottom of the loaf so it would not have contact with the hot Dutch oven. If you want the bottom of the loaf to have contact with the hot Dutch oven, you may want to try a light sprinkling of cornmeal or semolina flour and not bother with either the parchment paper or sling. It’s also important to consider that this multigrain bread is a bit more moist and dense than a white flour loaf, which can result in a softer, less crusty crust. Hope that helps!
Lisa
I thought it was a great easy recipe. I followed directions just as the recipe said. It turned out perfect 😊
Elizabeth Lindemann
So glad you liked it!
Jane
I have been making no knead bread for several years and have learned a few things: simply mix all the dough ingredients together in 1 bowl using warm water. No need to test it with a thermometer or to proof the yeast separately. It may take up to 5 hours to rise. I put mine in the oven with the oven light on where the temp is always constant.
Secondly, I bake at 400° starting in a cold Dutch oven, loaf pans or whatever and bake for about 40 minutes. If not dark enough on top turn the broiler on for a few minutes and watch carefully so the seeds don’t burn. The bread is crusty all over and soft inside, a much nicer texture than produced by the hit Dutch oven. As well, the bread stays soft and fresh inside much longer.
Elizabeth Lindemann
Thanks for sharing all your tips!
Hugh Connelly
Great easy recipe and bread made this way is much tastier than the ones I’ve been making in my bread maker also great tip using the parchment paper.
Elizabeth Lindemann
So glad you liked it!
Theresa
This was delicious! I find a lot of the no knead breads a bit tasteless, but this had a lot of flavor. Everyone in my house loved it.
Elizabeth Lindemann
So glad you liked it! I agree, the grains and seeds add tons of flavor. Thanks for this review!
Kelly
Note: There is a discrepancy between the prep/bake time in the description and the prep/bake time in the instructions.
I was delighted to find this recipe, as all of the other recipes I’ve seen for no-knead bread call for nothing but AP flour. I made this recipe tonight after making your original Dutch oven bread recipe earlier in the week (which is only my third loaf of yeast bread ever!). I had all of the ingredients on hand from a Danish rye recipe I tried a few months ago. I carefully weighed the flour, checked the temp on the water, etc. The loaf did not rise as much as I had hoped during the baking phase. I wonder if preheating the Dutch oven would have helped that? It came out moist, but not raw or gummy. (I did toss a few ice cubes between the parchment and the pot). It’s on the more dense side, as expected, but I think I maybe could have let it rise a little longer before baking – I am not great at judging “doubled in size”. It has a complex flavor. I am wondering if you have tried letting this one sit in the fridge for a few days to develop the flavor even more. I will try again next week with a few adjustments. Overall, it’s a win!
Elizabeth Lindemann
So glad you liked it! Thank you for pointing out the timing discrepancy – I fixed it.
And thank you so much for your thorough comment! I’ve added a part to the recipe card about optionally preheating the Dutch Oven – I think you’re right, it may help yield a taller loaf especially in this case where the whole grains and seeds tend to weigh it down.
I personally haven’t tried letting this one sit in the fridge but I do think it would help develop the flavors. Alternatively, you could try the method by which you use 1/4 teaspoon of yeast and let it sit overnight at room temperature – this is how many other no knead bread recipes are done and it helps develop both flavor and more gluten (I have trouble planning that far in advance though, which is why I developed the quick rise method!).
I’ve been letting my dough rise longer and longer lately, really testing the boundaries of how much I can let it rise without it over-proofing. I do find that it often needs longer to rise than I think, especially in colder weather – you don’t want it to over-proof of course, but yes you might try to let it rise for longer next time to see if that helps! Keeping in mind of course that the nature of a whole grain and seed bread, especially a no knead version, will always be on the denser side of things.
I’d be interested to know how it turns out next time you try it with any adjustments! Thanks again!
Susana
For the rising cycle in a warm place would it be ok to use the bread proof setting on my oven for this recipe as I do for loaf bread, cinnamon rolls, etc?
Elizabeth Lindemann
Sure! Whatever proofing method you prefer will be fine.
Susana
Thank you!!
Jules
Is the Dutch oven cold when you put in the loaf or is it preheated?
Elizabeth Lindemann
For this recipe I did it cold. In my other Dutch oven recipe I preheat it (though I often skip the preheating in that one as well!) and it worked well to not preheat it for this recipe.