
Homemade Potato Chips


Making Homemade Potato Chips is so easy and healthy, especially when they’re baked in the oven! You only need 25 minutes and three ingredients– potatoes, oil, and salt- to make these crispy, crunchy, addictive potato chips. Eat ’em plain or dunk them in your favorite dipping sauce!

If you have potatoes in your pantry and you aren’t sure what to make with them, I recommend trying out homemade potato chips.
I just love them. They’re everything you love about potato chips- crispy, salty deliciousness- but without the guilt you get reaching for that bag of store-bought chips! These are no unhealthier than roasted potatoes.
In fact, there’s only 1 tablespoon of extra-virgin olive oil in the whole batch!
These homemade baked potato chips are a bit thicker than your average potato chip, which also makes them a bit heartier (read: you might actually fill up on them rather than mindlessly eating chips from the bag until they’re all gone).
And while this recipe calls for only salt as a seasoning, you can add any seasoning you want to these chips!
Here are some tricks for making PERFECT homemade baked potato chips in your oven.
How to slice the potatoes
It’s important to slice the potatoes very thinly and uniformly. Luckily, there’s a handy device that will let you do this perfectly in only a couple of minutes!
A mandoline slicer is your best bet for cutting the potatoes. A mandoline is a handy kitchen tool- you can use it to thinly slice potatoes for chips, cucumbers for pickles, carrots, and any number of ingredients.
And it often comes with attachments for different kinds of slices, such as a grater and a wavy blade that will slice potatoes or cucumbers into ruffles!

What if I don’t have a mandoline slicer?
No worries. You can use a sharp chef’s knife to slice the potatoes as thinly and uniformly as you can. Or, you may have a side on your box grater that will do roughly the same thing!
How to make oven-baked potato chips
- After slicing the potatoes, put them in a bowl and drizzle them with 1 tablespoon of olive oil. You actually don’t want too much oil, since the potatoes may burn easier. Use your hands to make sure every surface of every potato slice is covered in a thin layer of oil.
- Arrange the oil-covered potatoes on a parchment-covered baking sheet. Make sure they aren’t overlapping, but they can touch on the edges a bit.
- Sprinkle the potatoes evenly with salt and any other seasonings you want.
- Bake in the top half of a hot (425 degrees F) oven for 15-20 minutes. They should start to get golden brown at this point.
- Then, if you have time, turn the oven off and let the chips sit in the cooling oven for 15-30 minutes. This will help them crisp up a bit more, as they continue to dehydrate with the oven’s warmth without burning. I use this method with roasted chickpeas, as well. KEEP AN EYE ON THEM- if they are already very golden brown, the residual heat of the oven and baking sheet may put them over the edge and burn them.
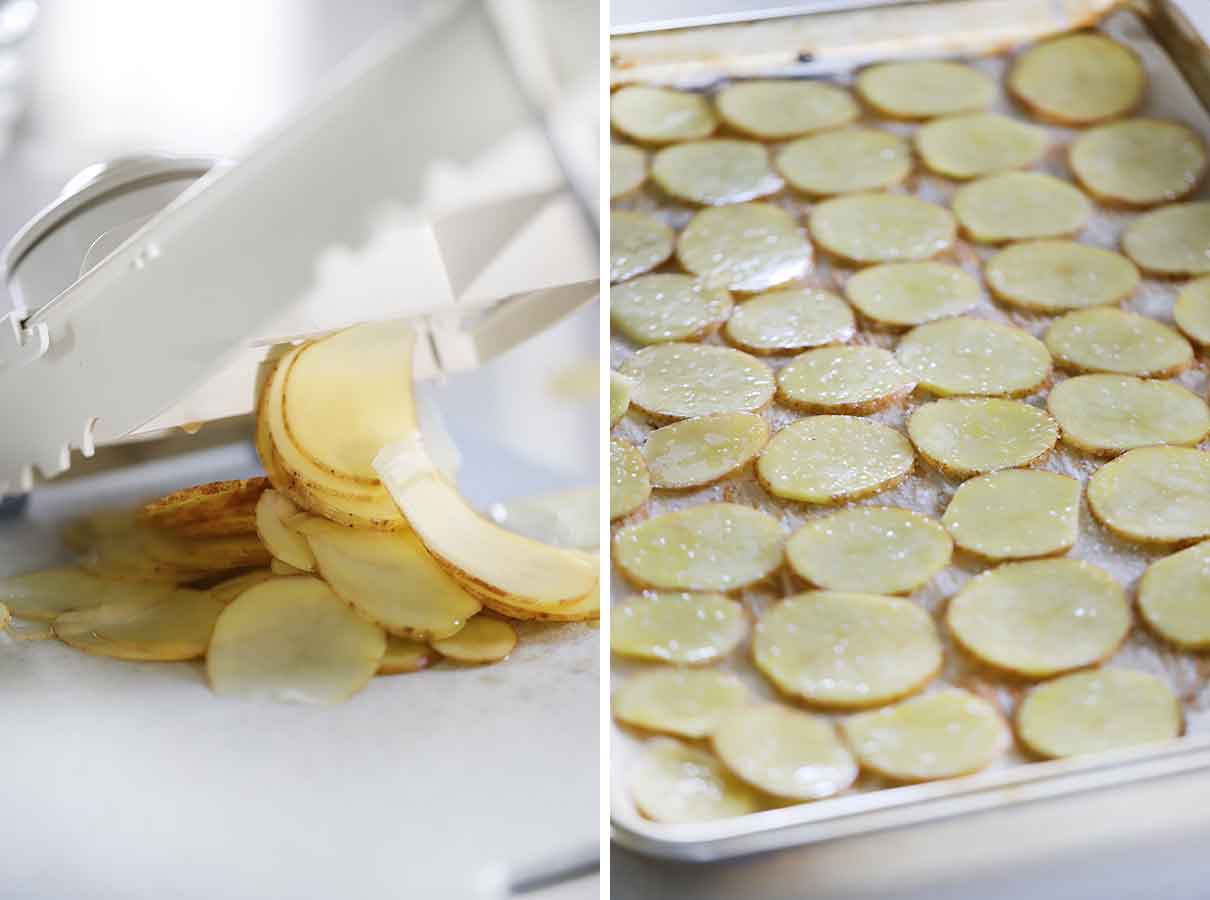
Tips and tricks
- The thinner you slice the potatoes, the crispier they will be. BUT, they will also burn more easily. Keep an eye on them if you slice them very thinly!
- I like my potato chips really salty, so I used a whole teaspoon of kosher salt. You can always use less, and season with more salt after you bake them.
- If you baked them and they aren’t as crispy as you like, they may be a little chewy and still delicious. But if that bothers you, you can stick them BACK in a hot oven to try to crisp them up a bit more.
What kinds of potatoes should I use for homemade potato chips?
You can use any kind you want! I used gold potatoes. And best of all, you don’t need to peel them. Just give them a good scrub with a vegetable brush.
Can I use sweet potatoes?
Yes! Follow the same method, but know that because sweet potatoes have less starch and more liquid, they will never get quite as crispy as white potato chips.
They may take a little longer to cook, so keep an eye on them. And if you like, you can flip them halfway through cooking to try to get them to crips up a bit more evenly.
I think sweet potato chips would be delicious with some cinnamon sprinkled on top. YUM.

Can I store these for a few days?
Homemade potato chips are best served fresh.
But, as long as you dehydrate them really well and they’re super crispy, you can keep them in an airtight container at room temperature for 2-3 days.
What to serve with homemade potato chips
- Serve them with a dipping sauce, such as honey mustard, dill dip, or avocado sauce.
- On the side of BBQ chicken with your favorite coleslaw.
- With a sandwich, like a ham, apple, and swiss panani or a fresh mozzarella, tomato, and basil sandwich.
- On the side of oven-fried chicken tenders or oven-fried catfish.
Here are all my homemade appetizer and snack recipes.
Did you know commenting and rating recipes is one of the best ways you can support your favorite food bloggers? If you made these homemade baked potato chips, please click the stars below to comment and Rate this Recipe

Homemade Potato Chips
Want to save this recipe?
Equipment
- Mandoline Slicer
Ingredients
- 2 cups thinly sliced potatoes any kind will work (about 2 medium sized potatoes)
- 1 tablespoon extra-virgin olive oil or other oil
- 1 teaspoon kosher salt
- other spices, such as black pepper, paprika, garlic powder, chili powder, etc. optional
Instructions
- Preheat your GAS oven to 425 degrees F. Line a rimmed baking sheet with parchment paper.
- In a large bowl, mix together the potato slices (2 cups) and olive oil (1 tablespoon). Mix well so every surface of every slice of potato is covered evenly- you may want to use your hands for this, since the sliced potatoes may stick together.
- Place the sliced potatoes on the prepared baking sheet, making sure they don't overlap (but they can touch a little on the edges). Sprinkle them evenly with the kosher salt (1 teaspoon) and any other spices you want to use. Bake in the top half of the oven for 15-20 minutes, until golden brown. Turn OFF the oven and allow to sit in oven while it cools off 15-30 minutes (ONLY do this with a gas oven. See notes for electric. This is optional if you're in a hurry, but highly recommended, as it will make the potatoes crispier. Keep an eye on them though- the residual heat can quickly burn them if you aren't careful!).
- Serve potato chips plain or with your favorite dipping sauce.
Notes
- If using an electric oven: these instructions are written for a gas oven. Electric ovens tend to retain heat more, and since these do burn easily, you'll want to be careful. Try baking for less time, in the middle rather than top rack, and if you want to keep them in the oven to continue dehydrating, I recommend cracking the door open a bit to allow some heat to escape.
- I recommend using a mandoline slicer to slice the potatoes uniformly and thinly. You can use a knife if you don't have one, but try to make them as uniform as possible. You may also have a slicer on your cheese grater you can use.
- Make sure not to crowd the baking sheet. The potatoes should be in a single layer. If you want to double the recipe, I recommend using two baking sheets, and rotating them halfway through cooking to the bottom and top of the oven if you need to place them on separate racks.
- Be careful not to burn the chips. They may take a while to get an initial golden brown color, but after that, they will cook very quickly. The thinner they are cut, the more quickly they will burn.
- For sweet potatoes: follow the same instructions. They may take a little longer to cook, so keep an eye on them. They have more liquid and less starch, so by nature they won't be quite as crispy as white potatoes. If you like, you can flip them halfway through cooking to try to "crisp' them up more evenly (but don't worry if you forget about doing this).
Nutrition
Nutrition Information Disclaimer
The provided nutrition information is my best estimate and reflects one serving of the recipe (total servings indicated at top of recipe card). It does not include any added sodium from seasoning to taste, any optional ingredients, and it does not take brands into account. I use an automatic API to calculate this information. Feel free to calculate it yourself using one of these tools:



Haven’t tried this yet, but sounds easy enough for a recipe I am making using crushed potato chips.
Hope it works well for you! I’m so curious about the recipe that you need crushed potato chips for!
I followed the recipe exactly and they look nothing like this picture. They were either burnt or soggy… no in between. Won’t be using this again. 1
Oh no! Sorry to hear you had a frustrating experience. My initial thought was were the potato chips overlapping each other or touching each other? If so, that would result in sogginess, as the steam that evaporates from the potatoes gets trapped and can cause a soggy result. In this case, if you kept baking in order to crisp those up, some others would risk burning. This issue also may have been caused by uneven oven temperatures – sometimes there are hot spots in ovens that can overcook things (mine is the back left corner), so rotating the baking sheet halfway through baking can help.
loved the potato chips! I used crushed red pepper for some spicy chips and they were delicious!
So glad you liked them!
It makes no sense to heat an oven to 425F and coat the potatoes in olive oil that has a smoke point of 375F. Avocado oil? Fine.. smoke point 520F. But don’t heat an oven higher than the smoke point of your choice of cooking oil.
Avocado oil is a wonderful alternative to olive oil. However, many people, myself included, use olive oil for almost every kind of cooking – high heat or otherwise. It’s not entirely true that going past the smoke point on olive oil is a “bad” thing – this article from Real Simple does a good job at explaining the nuance behind heating olive oil, with sources cited, that tells more of the story here. Hope that helps, and feel free to use whatever oil you are comfortable with! I prefer olive oil. https://www.realsimple.com/food-recipes/cooking-tips-techniques/olive-oil-smoke-point-myth
Hi, do I have to use a gas oven to make these chips or can I use any regular oven?
You can use an electric oven – there’s a note in the recipe card about it. Here you go:
If using an electric oven: these instructions are written for a gas oven. Electric ovens tend to retain heat more, and since these do burn easily, you’ll want to be careful. Try baking for less time, in the middle rather than top rack, and if you want to keep them in the oven to continue dehydrating, I recommend cracking the door open a bit to allow some heat to escape.
Worst recipe I have ever done. Followed to the letter the potatoes burned to back pieces in 12 minutes
So sorry you had a frustrating experience! Were you by any chance using an electric oven? These instructions were written for a gas oven, and electric ovens retain more heat so they can cause a different result. My apologies for not including that specification in the recipe instructions. I’ve just updated the recipe card with a note about how to use an electric oven- here it is:
These instructions are written for a gas oven. Electric ovens tend to retain heat more, and since these do burn easily, you’ll want to be careful. Try baking for less time, in the middle rather than top rack, and if you want to keep them in the oven to continue dehydrating, I recommend cracking the door open a bit to allow some heat to escape.
Hope that helps, and again, sorry this happened!
Shelf life? Thinking of making for my boyfriends lunches
They never last that long for me haha! I don’t think they would stay super crispy for very long unless you properly dehydrate them.
I bought a very inexpensive mandolin at Walmart and it works great for these chips. I used a very light sprinkling of Chicago Steak Seasoning on each chip and they were gobbled up in minutes!! Definitely make time to leave them in the oven after you turn it off. I found it to be essential for a Crispy chip!! Thank you so much for this wonderful recipe!!
So glad you liked it!
Do you have to use oil on the chips ?
Yes otherwise they will burn. For oil free potato chips you may just want to dehydrate them- I would do a google search for “oil free potato chips” or “dehydrated potato chips” if you don’t want to use any oil.
The recipe looks interesting. But I don’t hear you drying the sliced potato chips.
You can pat them dry if you like but I skipped it and it was fine!
Homemade is the way to go.
Excellent way to use up potatoes. We like to eat healthier but a good snack this is perfect. Smoked paprika or cayenne or even season salt all work well too.
Thanks
Glad you liked it!
Hi Elizabeth,
Made your baked potato chip recipe today & they delicious. This was the only recipe I could find that didn’t soak the potato slices first so I thought I would give it a try. I used russet & ended up making a double batch. Only thing I did different with the second batch was to lower the oven temp to 400 but left them in 20 minutes total, rotating pans as suggested.
Thank you for posting. I will be making these again & again.
Diane
So happy that this recipe worked for you! I wanted to make a recipe that didn’t require soaking to take away unnecessary steps and save on dishes. Though I did just make a potato wedges recipe that I soaked beforehand and it did do great things to make them crispy… so I might have to try that with the potato chips too at some point. But I’m all about getting rid of unnecessary steps! Thanks for sharing your tips for timing and temp.
Sounds like fun
These turned out so well! I’m really happy to have found this recipe.
So glad it worked well for you!
My husband loves potato chips but can’t have due to his health. This is a good alternative. I sprinkled mine with a little smoked paprika. We loved them.
So glad you and your husband liked them, and I love the idea of seasoning with smoked paprika!
Try garlic and onion powder. Homemade on both is always better. Also add ground hot peppers for a different taste. You can always pick and choose different ways to spice them up
Great suggestions, thanks!
These were lovely. Definitely Recommend as a nice treat. My Kids love Pringles so this is a nice healthy substitute! Thanks for the recipe!
So glad you and your kids liked them!
Hello I have a dehydrater can you use this instead .?
You can definitely use a dehydrator to make potato chips! I’ve never done it, but here’s an article that should help you: https://dehydratorblog.com/dehydrated-potato-chips/ and here’s one for sweet potato chips that uses oil and salt, similar to this recipe: https://thehealthyfamilyandhome.com/dehydrated-sweet-potato-chips/ (you can probably take lessons from each and use oil for the white potatoes, too!)
These look delicious. I’m going to try them today. What thickness did you use on the mandolin?
I tried both really thin and the thickest it would go (which seemed like 1/8 inch)- both worked but the ones photographed were the thicker ones, they cooked more evenly!
An you do the same recipe with sweet potatoes?
Yes! You may need to cook for a little bit longer but it’s the same other than that. Just keep an eye on them and check on them as they are cooking and you should be fine 😊